STEP BY STEP CROP ROTATION – A YEAR OF SOLANACEAE & ALLIUMS


Deep Winter has been about planning, anything planted out has had a miserable stunted look to it, a bitter reminder that I should have planned my planting earlier when the weather was still sweet. There are still some sorry looking tomatoes and capsicums clinging to their withering stems, the eggplant lingered long enough to shelter a brood of ladybird larvae until they grew wings flew away home, and it curled itself up. A better time for dreaming about gardening than actually doing it.

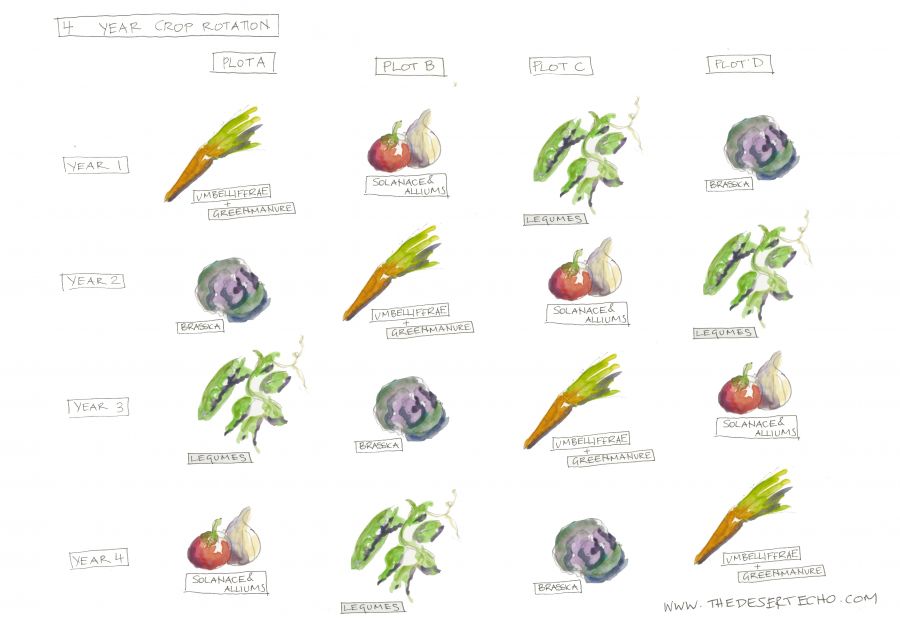
One rainy day I logged into Google Analytics and noticed my post on the 4 Year Crop Rotation gets at least one view a day, often more. It gave me a delicious thought, would you dear reader like to walk through a year in my plot?

A week by week plan of how the rotation actually works?

 
Since November the garden has been busy settling in to its new digs, Legumes have been occupying my plot, taking nitrogen from the air and enriching the soil for a new year of Solanaceae.
So come on a journey with me a beautiful year of growing juicy tomatoes, chillies, capsicums and eggplants!

ALTERNATIVE TEXT


ALTERNATIVE TEXT


ALTERNATIVE TEXT
ALTERNATIVE TEXT


In Australia where the sun runs screaming past plentiful and sprints headlong into harsh, bare earth is an absolute crime. Space is also at a minimum (1x2m) so a plan was absolutely necessary to cram as much in as possible. I’ve divided my plan into Solanaceae and Companions and this works beautifully as these fall neatly into the categories of
tall and low level plants and early and late planting. I read somewhere that tomatoes really shouldn’t be rushed into the ground until the temperature is reliably over 10C and according to the BOM this doesn’t occur until November in Melbourne. So while my Solanace seedlings wait to be planted out the companions will have the opportunity to
establish themselves as a nurse crop to shelter the young Solanace plants when they go in. When the weather grows spitefully hot, in Deep Summer, the tomatoes will have grown tall enough to shade their companions whilst they in turn protect the tomato roots from drying out.


ALTERNATIVE TEXT


Continue Reading

THE FLEMINGTON PERMABLITZ PART 3 – FROM WATERCOLOUR TO REALITY

Watercolour plan of the espalier orchard and chook yard

Aligning the posts for the espalier orchard/chook yard at the Flemington Permablitz

Laying barbed wire in the earthbag garden bed wall at the Flemington Permablitz

Watercolour plan of the earth oven

Filling the earthbags, scoria and shadecloth laid on bottom of raised garden bed for drainage at the Flemington Permablitz

Felix levelling the scoria for drainage of the raised garden beds at the Flemington Permablitz

Kids rendering the earthbags at the Flemington Permablitz

Watercolour plan of the food forest

Mark mixing the earthen plaster to render the earthbag garden bed at the Flemington Permablitz

Rendering the earthbag garden bed walls at the Flemington Permablitz

Aerial of the garden after the permablitz, Flemington

Watercolour plan of the Flemington Sharehouse Garden

We called an armistice with the sky while we dropped shovels for lunch. The Blitzers made use of the newly constructed garden walls to gather around while we explained the design.


The raised earthbag garden beds form our Zone 1, the part of the garden we visit everyday. We were inspired by one of our Permaculture tutors who shared his garden responsibilities with his housemates by allocating each one a plot and a plant family to look after. This was so very appealing after oh so many days last year where we were late to work trying to get everything watered and sheltered in preparation for a particularly brutally hot day. So the annual beds are divided into four for a four year crop rotation so each housemate has a little piece of land all of their own and are assured of the purity of their seed saving (no more fights over contaminated brassica seeds, haha no we really are more civilised than that). Everyone seems pretty keen to get involved, even our housemates who have never grown a lettuce before (let’s home Melbourne’s climate is kind to them, she can be cruel).

The two “ribbons” of beds are thread so there is a path around the edge for a quick sandwich harvest before work with a more direct root down the centre to the woodpile/worm farm. The bags are at two different seating heights so kids, giants and the vertically challenged alike can find a nice sheltered place to soak in the sun or have a chat. The earth oven is the highlight of Zone 1, but will have to wait until after the Blitz to roar into life, as the rain just won’t let us make the sand mould! It is sheltered from the ghastly flats next door by the big tree, which brings us to Zone 2.

Despite the shade we are trying our best to grow a Food Forest to the West to block out the overlookers with Avocados and Tagasaste. Only time will tell how successful we can be. The Orchard to the east is where we will grow crops like corn between espalier trees, and maybe even our dream of a banana. (It can be done in Melbourne!) In summer the chooks, on the border of Zone 1 and 2 will doze in the shade of the shed and in winter when it is colder they will free range through the orchard after the corn has been harvested and reinvigerate the earth. And so that is how we have tried to make each area have multiple uses: the annual garden beds/seating & entertaining area, the food forest/neighbour shade and the orchard/chicken range.


And so the Blitzers went back to work, so keen that many stayed well after wrap up time and could’nt be pried from earthbag or rendering glove until after 6. The children in particular were so full of beans that when an exhausted father asked hopefully if they were ready to go they answered a definitive “NO” and he trudged defeated to the couch for a nap. As people started drifting away the transformation truely sunk in, it had taken us weeks to build the first two beds and in only a day the Blitzers had almost finished the remaining two, plus the posts in the orchard, a wicking bed and some rendering to top it all off.

Continue Reading

4 YEAR CROP ROTATION FOR A SPOTLESS LIFE

Detail of trees on the plan for the Permablitz in Coburg, Australia
Watercolour plan for the Permablitz in Coburg, Australia

Detail of pond and arbour for the Permablitz in Coburg, Australia

Bright eyed and bushy tailed we began our gardening adventure in July last year and of course we made the kind of mistakes that seasoned gardeners would snigger at such as planting 10 broccoli and 10 cabbages in a metre square. But that was easy to fix. When the bed bulged embarrassingly with bounty the chooks had a delicious snack on our excesses.

However one thing confounded us. At first the tomatoes we planted in the front garden grew just as happily and just as fast as the ones out the back, all of them delighting in the summer sunshine, but then EPIC FAIL! The ones out the front got one then two then a veritable patchwork of horrible yellowy brown spots! They shrivelled away. We ran to books and blogs to work out why.  Apparently before we moved in, this north facing position had been prime tomato territory and this was our first introduction into the need for crop rotation.

Just as you would become malnourished if you ate nothing but tomatoes and potatoes, growing things from the same family year after year in the same spot will create an imbalance in your soil. Plants from the same family such as Solanaceae (that’s your tomatoes, potatoes, eggplants, capsicums and chilis) have similar nutrient requirements so they will strip every last bit of these from the ground. But more importantly rotating your crops reduces the spread of soil-borne diseases and pest problems as these guys attract the same nasties.

Diagrams for the 4 year crop rotation for the Permablitz in Coburg, Australia

So here are the four main groups we suggested for the Coburg Blitz:

Plot A: Umbeliferae (carrots, celery, parsnip, coriander, etc) followed by a green manure in the cooler months to replenish the soil for the next year’s crop

Plot B: Solanaceae (tomatoes, eggplants, capsicums, potatoes, etc) which are very nutrient hungry with Alliums (onions, garlic, leeks, etc)  in the cooler months

Plot C: Legumes (peas, beans, etc) that fix nitrogen in the soil ready for a nutrient hungry crop to follow

Plot D: Brassicas (broccoli, cauliflower, cabbages, brussels sprouts, etc) that need a nutrient rich soil

And the next year the nutrient restoring crops will be replaced by the nutrient depleting crops. The root crops following the nutrient depleting crops, as too many nutrients in the soil result in very bush leaves, but disappointing roots.

The beauty of this system is that plants not in these main families such as many herbs, flowers, lettuces, beetroot, silverbeet and spinach can be mixed in amongst each plot to allow all plants to benefit from companion planting. For a full list of the plant family groups I recommend checking out The Seed Savers Handbook. This system is really ideal for a sharehouse, where each housemate can look after a bed themselves and not have to work about other people growing things that will cross-pollinate with their produce come seed saving time. I’m excited about suggesting this to my housemates … but first 1 Permablitz down 2 more to go until we can do our own garden!!

Explanation of 4 year crop rotation with reasons for the order of plants for the Permablitz in Coburg, Australia

Diagram of 1st year of 4 year crop rotation for the Permablitz in Coburg, Australia

Plants that can be scattered through crop rotation garden beds as companion plants for the Permablitz in Coburg, Australia

Diagram of 4 year crop rotation for the Permablitz in Coburg, Australia

List of plants in main crop rotation garden beds for the Permablitz in Coburg, Australia

Click on the images above to view larger on my flickr.

Please comment on this post if you found it helpful, I’d love to hear about your gardening adventures!

Continue Reading